Bluebeam Revu for the Tilt-Up Contractor

Save Time While Reducing Risk and Rework
This time we’re going to focus on how Tilt-Up contractors use Bluebeam Revu to save time while reducing risk and rework. Over the last year, I’ve been writing about different trades and how they’re getting the most out of Bluebeam Revu in their everyday workflows. I hope you’ve pulled some ideas from each one and applied them to your workflows. As I look at the list of companies I’ve worked with, there’s no end in sight to the number of different trades to highlight in articles like these.
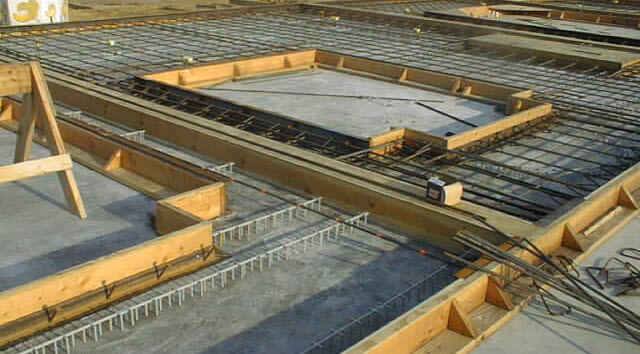
If you’re not a Tilt-Up contractor, let me start with my simplest explanation of their trade. Just like any project, the foundation is first set below grade and the floor slab is poured. This slab becomes the working surface for all the wall panels. Forms are laid out on the slab with embed plates and openings before pouring concrete directly on top. Once these panels are dry, they are tilted up off the slab and erected into the correct wall location.
In this article, we’ll cover the technical side of:
- Overlay Pages
- Concrete Quantities
- Rebar Quantities
- Equipment Staging
- Paper Dolls
Overlay Pages.
Often times on tight job sites temporary soil retention is required and a Sheet Pile Plan is produced. This plan locates the engineered placement of large interlocking vertical plates driven into the earth as a temporary retaining wall. I’ve worked with contractors who use Overlay Pages to superimpose the Sheet Pile Plan over the Building Plans to see how they relate or if there are any interferences with the Site Logistic Plans. Overlay pages has huge advantages and only a few easy steps.
- Under the Document Menu, select Overlay Pages.
- In the resulting window, browse to one of the drawing files, then the other. You can overlay several drawings on top of one another and assign different colors, but more than four drawings become kind of messy.
- Use the Align Points button to select three points all the drawings have in common. This is typically a building corner or grid intersection.
- After aligning all the points, Revu will create a new document with all the drawing files overlaid on top of one another. You can now see how the drawings relate to each other.
Overlay Pages, is often introduced as a tool to highlight what changes were made when drawings are revised, but as you can see, you can also overlay different trade drawings. This becomes a rough two-dimensional clash detection drawing.
Concrete Quantities.
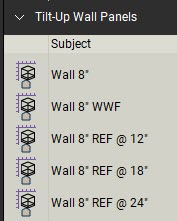
Custom tools can quickly be built and shared for different types of pours. Prebuilding unique tools for different common wall thicknesses can reduce errors eliminating the need for users to update the thickness each time. I like to build tools that the most basic users will trip into using correctly, and they really have to go out of their way to do things wrong.
By populating the Subject and Label properties, you can not only identify the tools in the ToolChest, but also sort and filter the Markups List to see totals. This task is really easy and fills your markups with rich data for downstream use.
- Select all the similar markups (all the 8” concrete wall panels) either in the plan view or in the Markups List.
- Go to the Properties Panel on the right or left side of the interface. Enter a brief description in the Subject and Label fields. The Label can also be turned on and shown on the drawings.
Rebar Quantities.
I cannot count how many times I’ve been asked if Bluebeam could do rebar calculations, probably every time I’ve been asked about concrete. Based on what I know about how rebar is laid out, quantities are just a factor of the shape of the concrete and the spacing, and the clear distance from the exposed edge. With a few advanced custom columns, I created adjustable parameters where the user can enter rebar size, number of mats (top & bottom), and required spacing in each direction. With built-in formulas, the results in the Grid Total column will produce the total linear footage of rebar. Clicking on the Rebar Size column and the Markup List will re-sort and give totals for each different size.

*Full disclosure, because of the way Revu reads and reports the width and height of markups, there are limitations to if these tools work or not.
I went into more detail on concrete and rebar quantities in my “5 Ways Concrete Contractors Get the Most Out of Bluebeam Revu” blog post. Check out the embedded video in that post.

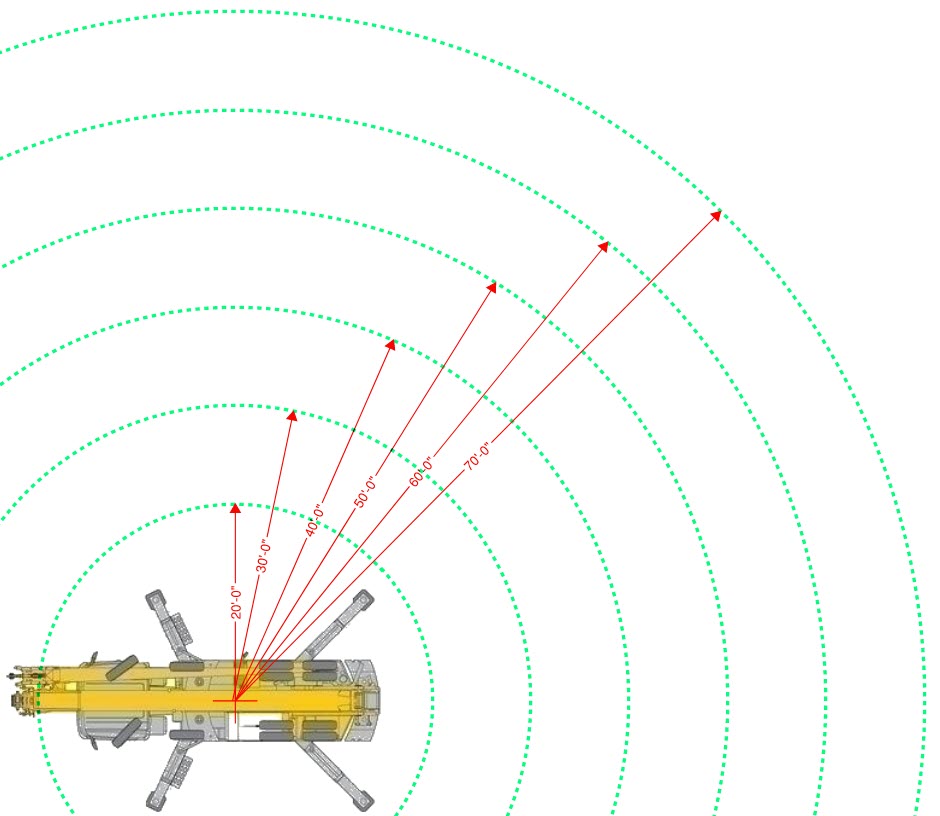
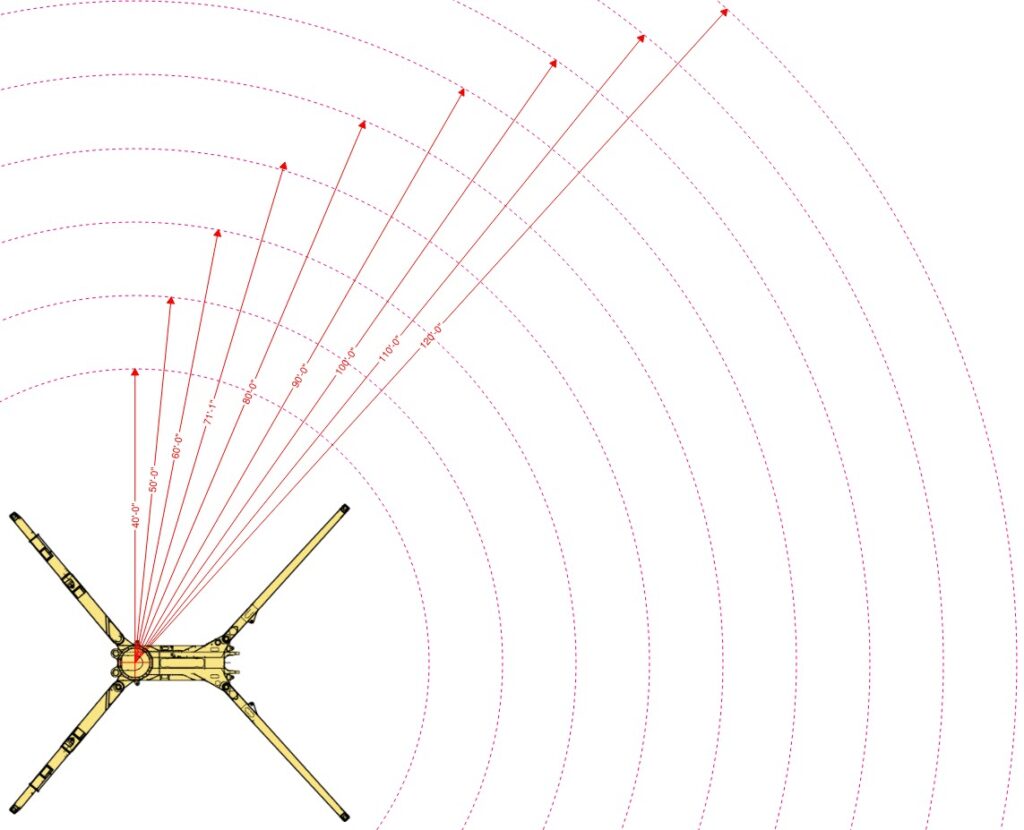
Equipment Staging.
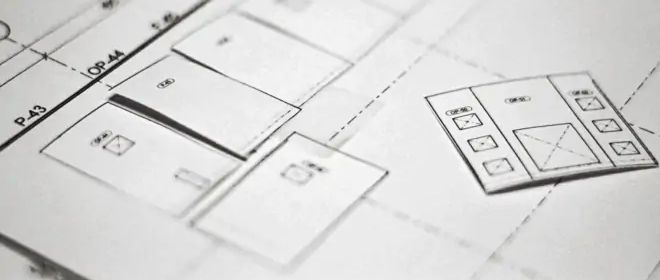
Where large equipment is stored when not in use, or more importantly having them located in the correct location during use is another way we can use custom tools in Revu. Having to-scale symbols that represent tower cranes, stationary concrete pumps or material layout areas will allow you to precisely place equipment for the most efficient use. For instance, a crane symbol with a reach radius shown can help you plan out your pick points. A stationary pump tool with a slewing radius shown for the boom extension length will help you plan to efficiently layout your forms and maximize the workable space. Safety planning can also be more evident when overhead powerlines are represented on the drawings.
Paper Dolls
In a paper workflow, “Paper Dolls” was a process of cutting out each panel from the elevation drawing and placing the pieces on the slab plan in whatever configuration made for efficient pour sequences. After listening and understanding the process I was able to develop a workflow in Revu.
- Be sure to Calibrate your drawing before you attempt to make any measurements.
- Using the Volume Measurement tool, set the correct Depth in the Measurement Panel.
- Trace each panel on the elevation plan to get the exact shape including the openings.
- As you’re going through, be sure to add a panel number to the Label and Subject fields in the Properties Panel. Be sure to check the box to have it displayed.
- Create a new Toolset called “Tilt-Up Paper Dolls” in the Tool Chest Panel.
- Once complete, select all the measurement markups, right-click and select “Add to TooChest” and place them in your new Tilt-Up Paper Dolls Toolset.
- Pick on the Properties Gear on the upper-right side of the Toolset and select “Set Scale”. This will calibrate the Toolset to the scale of the sheet it was taken from.
- Next, open the foundation or slab plan and be sure to calibrate to define an accurate scale.
- You can now pick each panel tool from the Toolset and place them on the plan. The symbols will adjust in size to match the scale of the plan when you place them.
- Notice each panel in the Toolset has the panel name in the Subject column, and the panel number is displayed on the tools when laid out on the slab as well for reference.
- When you finished simply right-click on the tools in the Toolset and delete the temporary tools leaving your Toolset ready for the next elevation.
As always, if you prefer learning from a demonstration, check out this video I created with all the same information.
I hope highlighting a series of specialty contractors is helpful. Whether this is an exact match to your specialty, or you draw inspiration to your workflows, I’m happy to help in whatever capacity. Having built custom tools and workflows for hundreds of companies, I may have already worked with your peers and could easily apply best practices to your workflows. A quick call can kick things off.
For more information on this topic, Click Here for a parallel article written for Bluebeam.


[…] For more details on how tilt-up contractors can use these workflows, click here. […]