How to Easily Set Up Quantity Link in Bluebeam Revu
One of my favorite features in Bluebeam Revu has been out for about four years. I’ve worked closely with several companies building some pretty awesome Bluebeam Revu quantity takeoff workflows. Yet I’ve never written about it, that’s like not telling someone about your new puppy. Let’s start, in this article, by walking through how to easily set up quantity Link in Bluebeam Revu.
I totally geek out when it comes to building custom estimating tools. It’s like a puzzle of colors, layers, formulas, and knowing the tricks of each measurement tool. It’s remarkably similar to visualizing a construction project when that image in your head is finally physically standing in front of you. That project you tell your kids about every time you drive by until they say it first.
Not all of us are estimators performing material takeoffs, but we all measure something and display the results in some fashion. See my article publish on Bluebeam’s Built Blog for “The Top 5 Ways to Use Quantity Link in Revu.”
Architects, developers, city planning, public works all have to present data to cast a vision of their design intent. I’ll detail some of those examples in my next blog post, but for this one, let’s start with an estimating application to show how to easily set up Quantity Link in Bluebeam Revu. I’ll show you how it works, and get you thinking about your own application.
As a Specialty Contractor, you probably fit into one of these categories:
- You own an estimating software that’s no longer supported, and that next overnight Windows update means your left scratching your head wishing you did something yesterday.
- Maybe you have a great estimation program, but its not visual and you manually highlight the plans as you perform manual data entry.
- Do you have an existing spreadsheet full of formulas, doing your calculations. It works perfect, but again its not visual and you’re manually performing data entry.
- Or, you put your wet thumb to the wind and wing it with a sketch pad and math only you understand.
I literally just heard you say “Yep”. I’ve heard them all and know there are solutions in Revu. I also respect the legacy and success of your company which has hinged largely on those same bullet points, because they work. You may think everything changes when you “go digital”. I’m here to tell you that’s simply not true. I customize Bluebeam to turn your legacy workflows into modern, consistent, digital processes that are predictable, streamlining training interns and new employees.
Let’s get back to Bluebeam Quantity Links and quickly show you how to properly set up your new linked digital workflow. I think you’ll be surprised how easy it really is. Here are the steps we’ll cover:
- Create custom tools.
- Marking up drawings.
- Connecting Microsoft Excel.
- Results & Possibilities.
Just a few housekeeping things first. You will need a license of Revu Extreme to have the capability of Quantity Link and connecting with Excel. Alright, here we go, How to Easily Set Up Quantity Link in Bluebeam Revu.
Create Custom Tools.
I could dedicate the rest of the year to blog posts focused on how to create custom tools in Bluebeam, things to pay attention to, and best practices, but for this article, I’ll keep it pretty simple. As of right now, Quantity Link will only transfer measurements to a spreadsheet. This means we’re going to build a custom tool out of the standard measurement tools Revu provides.
For anything measured in linear feet or meters, I typically use the Polylength tool. When measuring square feet or meters, I obviously use the Area tool along with Dynamic Fill and possibly the Cutout tools as well. The Volume tool for cubic yards or meters and finally the Count tool for quantities of items. These four tools should allow you to quantify just about any type of building material or data based on accurate measurements.
What is the simplest way to start building custom tools?
- Pick the Polylength tool at the top of the Measurement Panel, and draw a line representing the length of a material on your drawing.
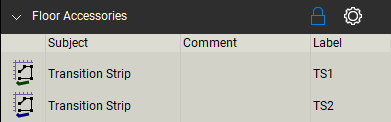
- Select the markup and go to the Properties Panel. Here you will see the “Subject” says Polylength. Update that to say “Curb” or “W8x10” or “Cat5e”, whatever that line might represent. I’ll call mine Transition Strip.
- Right-click on that markup and add it to your Toolchest.
Marking Up Drawings.
Once you’ve created a custom tool, simply trace over all the similar materials on the project drawings. On every project going forward, you now have a tool created for that material. Now, when you look at the markups list and click on the top of the Subject column, you’ll see all of that material grouped together, the length of each one, and a combined total. That, in itself, just replaced all your colored highlighters. Makes you want to build more tools, doesn’t it! Make sure to save your file so the markups are saved.

Connecting Microsoft Excel.
With the file saved, we now have a custom tool to target search for in Excel, let’s set up the Bluebeam Excel quantity link and watch the magic. Go ahead and open a spreadsheet. Whether it’s a blank template for practice or your fully functional, formula-filled estimating spreadsheet.
Housekeeping here again: To make sure your Revu license recognizes it can connect to Excel, go to Revu > Administrator. A window will pop up asking you if you want to allow Bluebeam Administrator to modify your computer. Click Allow. This will bring up the Bluebeam Administrator window where on the Plugins tab at the top you’ll see listed all the applications you have installed on your computer that allow Bluebeam add-ins (who knew?). Make sure you have Microsoft Excel checked and click OK. Now let’s follow these steps to linking documents.
- Select a cell in the spreadsheet where you would normally manually input the total quantity of the material we just created. Right-Click and select Quantity Link > Create.
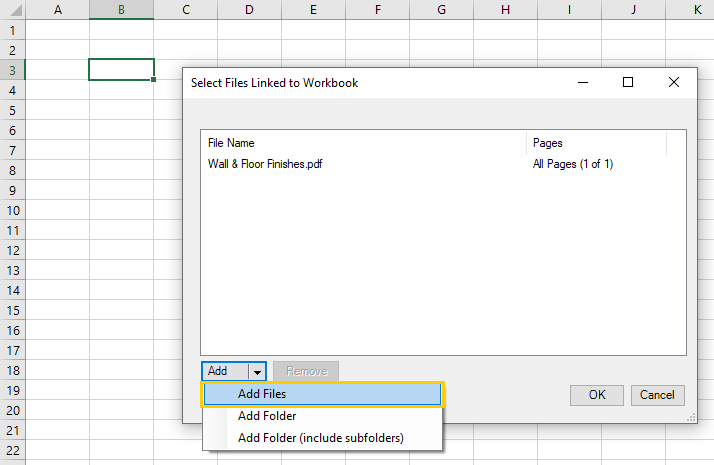
- In the resulting window you have the option to Add Files, Folders or Folders with Subfolders. This is where you want to point to the drawings you want to pull quantities from. Navigate to the files and click OK.
- Next you’ll see the window below. On the Total pulldown, select the measurement you want to link. Length, Area, Volume etc. (Note: this window will only show you tools that have been used in the drawings. If you haven’t marked them up, Revu cannot see them to link too).
- In the next pulldown, it wants you to identify the tool we created. You can see all the ways you can get specific and detailed with your custom tools. For practice, just select the Subject and pick on the name of the tool we created above. If you don’t see it, make sure you saved the PDF and you have the files connected. Click OK.

- In the example image above, I used the Subject for the category of markup (Transition Strip), then used the Label to select the specific type of Transition strip (TS2). These are parameters I built into the custom tools.
- You will see the total in that cell now matches what you had in the markups list on your pdf drawing. And that just replaced your data entry process!
Results & Possibilities.
If you just linked the drawings to your template estimating file, you now see how simply highlighting the materials on the plan can feed directly into the estimate, and how quickly you can adjust your markups and the estimate at the same time when a revision comes across your desk.
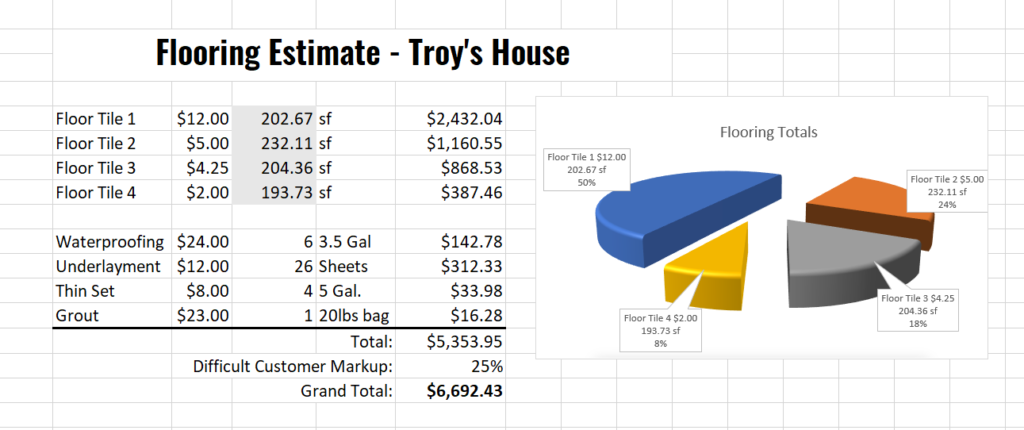
If you linked to a blank practice excel file, you now have a blank slate to get as creative as you want. Building out your template estimating file consists of adding a name for the material in the cell next to the total, and maybe another cell with the material cost per foot. In a third cell create a formula that multiplies the total measurement cell times the Cost cell (B4*C5)=E4. And just like that we also got rid of your calculator!

The possibilities are endless at this point, you have simple to use markups in Bluebeam Revu and you can get as creative and complicated as you want with the Excel formulas.
Case Study:
I once helped a lumber yard build tools for their entire inventory. We broke them down by phases for delivery and with the marked-up estimating drawings, they had the plans on-site telling them where certain materials were to be installed. This meant lumber allocated to large headers where not cut in pieces for smaller headers resulting in reordering and delivering new materials. It also meant the roof trusses didn’t need to be delivered with the foundation materials, they could come as a package when needed. No more warped, muddy roof trusses and weathered roof sheathing.
One Last Thing.
Once you’ve built a template Excel file and created all the links, save the file to a secure template location. When a new project comes in the door, make a copy of the Excel file to the folder where the drawings are saved. Saving in the same location assures if the folder moves, the spreadsheet file goes with it. Once the file is in the new project location connect it to the new drawings.
- Right-Click on a cell in the spreadsheet and select Source Files..
- Navigate to the new project drawing files.
- You only need to link the files, the cells are already looking for your markup totals.
- Start marking up your drawings and watch the values feed into the spreadsheet.
Obviously, this is just a brief description of the basics of Quantity Link. Can you see why I geek out on this stuff? Wait until I get into the details and talk about building assemblies to capture several materials with one markup. Make sure you catch next week’s blog post.
Need Help?
If you’d like to hand off the tool creation, linking, training, or any piece of your implementation, please don’t hold back a chance for me to geek out on your business workflows. Click here to schedule a free introduction call.
Also, I have upcoming training for these topics as well.
Bluebeam Material Takeoffs & Estimates – Basics August 19th
Bluebeam Material Takeoffs & Estimates – Advanced August 26th
For more information on this topic, Click Here for a parallel article written for Bluebeam.


[…] If you want to learn more about Quantity Link and the technical side of implementation, Check out the UChapter2 blog: “How to Easily Set Up Quantity Link in Bluebeam Revu” […]
[…] If you want to find out more about Quantity Link and the technical side of implementation, visit the UChapter2 blog: ‘How to Easily Set Up Quantity Link in Bluebeam Revu’ […]
[…] Om du vill veta mer om Mängdlänk och de tekniska aspekterna av att använda funktionen kan du ta en titt på bloggen UChapter2: How to Easily Set Up Quantity Link in Bluebeam Revu. […]
[…] Hvis du have mere at vide om Mængdelink og den tekniske side af implementeringen, kan du tjekke UChapter2-bloggen: “Sådan klargør du nemt Mængdelink i Bluebeam Revu” […]
[…] und der technischen Seite der Implementierung erfahren möchten, empfehlen wir Ihnen den Artikel „How to Easily Set Up Quantity Link in Bluebeam Revu“ des UChapter2 […]
[…] If you want to learn more about Quantity Link and the technical side of implementation, Check out the UChapter2 blog: “How to Easily Set Up Quantity Link in Bluebeam Revu” […]
[…] If you want to learn more about Quantity Link and the technical side of implementation, Check out the UChapter2 blog: “How to Easily Set Up Quantity Link in Bluebeam Revu” […]