Bluebeam Revu for Door Hardware Suppliers

Before we dive into doors, let’s review the construction process we’ve covered so far in past blog posts.
| Concrete Contractor | Bluebeam Blog Link | UC2 Blog Link |
| Framing Contractor | Bluebeam Blog Link | UC2 Blog Link |
| Roofing Contractor | Bluebeam Blog Link | UC2 Blog Link |
| Store Front & Curtain Wall Contracor | Bluebeam Blog Link | |
| Civil Land Development Contractor | Bluebeam Blog Link | UC2 Blog Link |
| Municipalities Electronic Plan Review | Bluebeam Blog Link |
For a door hardware supplier, digging through large plan sets to count windows and doors can be a tall task, especially when you consider all the intricate details indicated in the door schedules. In this article, I show four ways I’ve worked with door hardware suppliers to improve the accuracy and time spent tracking hardware assemblies. Before we get into the specific Bluebeam functions, we need to spell out the complexities involved in making sure the correct door shows up and gets installed in the correct location with the correct functionality.
How complex could a door really be, you might ask, you simply turn the knob and enter. As it’s always my goal to learn and customize Bluebeam to specific needs, it turns out there are actually a lot of considerations a door hardware supplier considers for each individual door.
Here’s a list of everything we need to know about every single opening:
| · Door Number | · Door architectural type | · Opening Label |
| · Interior/exterior | · Frame Manufacturer | · Opening Hand |
| · Opening type | · Frame Material | · To-From |
| · Opening size | · Frame Architectural type | · Keyset |
| · Door manufacturer | · Wall condition (fire rating) | · Hardware (handle) |
| · Door material | · Hardware (Hinges) | · Door thickness |
In this article, we’ll cover the technical side of:
- Custom Tool Sets
- Custom Columns
- Visual Search
- Custom Statuses
Let’s dive into another project example and look at how door frame and hardware suppliers are using UChapter2 customization within Bluebeam Revu to streamline workflows.
Custom Tool Sets.

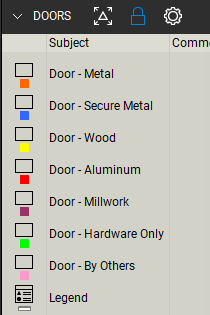
Creating a visual language using colors is a must for any specialty contractor, especially when the plan symbol looks the same and the details in the schedule indicate small differences. How you apply a color scheme is different for everyone. Do you want to visually see the difference in metal and wood doors or different fire ratings? In this case, we’re going to use color to indicate door material.
As you can see in the toolset image we have the most common door materials represented with unique colors. Any user within this company knows when they see a blue highlight on a door, it’s a secure metal door. When we have a project deadline fast approaching, these Bluebeam tool sets allow everyone to help mark doors with no variation in the markups. Other than the “author” in the Markup List, nobody should know the difference between who placed what markup.
Custom Columns.
In the Markups List, we get down to the details listed in the table above for each opening. To be clear, the purpose of this process is to integrate with a separate existing estimating application. We developed each custom column and the defined data to match what was typically entered manually. Some of the columns are loaded with defaults, others can be updated in bulk by selecting several doors and updating the properties all at once. At the end of the process, we export the markups to a CSV file which is imported into the estimating application.


Text/Visual Search.
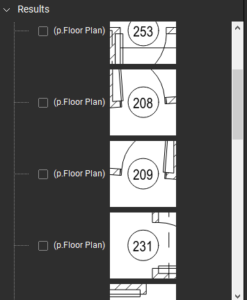
Visual search is a powerful feature we can use to find door tags or even wall-type tags. When looking through a large plan, rather than manually searching and highlighting wall types, it might help to use Visual Search to find wall tags. This way we know visually which fire ratings are required in specific rooms.
Next, we can use different shades of red on these wall types to indicate the fire rating minutes. For example, a 90-minute wall might be a much darker shade of red, a 30-minute wall much lighter, and everything in-between as needed.

Custom Statuses.
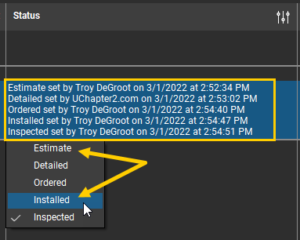
Another great functionality I like to implement when applicable is custom Statuses. In the markups list, we can create a custom status for each phase of a project. Here you can see each opening can be updated to indicate when the estimate is completed, when the detailing is finished, the door is ordered, installed, and inspected. At each step, it records the person and time the status was updated.
This data could also bridge a long-term relationship with the customer as the doors are inspected each year, statuses are updated, and replacement details are at your fingertips for warranty and replacement.
I hope highlighting a series of specialty contractors is helpful. Whether this is an exact match to your specialty, or you draw inspiration to your workflows, I’m happy to help in whatever capacity. Having built custom tools and workflows for hundreds of companies, I may have already worked with your peers and could easily apply best practices to your workflows. A quick call can kick things off.
For more information on this topic, Click Here for a parallel article written for Bluebeam.


[…] Over the past few months, we’ve worked our way through the concrete foundations to framing up to roofing contractors. Let’s make sure our building is closed up and look at workflows for windows and doors. […]
[…] Jetzt fehlen noch abschließende Elemente – schauen wir uns Arbeitsabläufe für Fenster und Türen […]