3 Ways Framing Contractors are Winning with Bluebeam Revu


There are many challenges facing a Framing Contractor, but several tools in Bluebeam Revu can remove some of the pressure. Today I want to give 3 ways framing contractors are winning with Bluebeam Revu. I’ve had the opportunity to build custom framing and lumber tools in Revu for companies from Minnesota to Montana. Every contractor is looking at projects differently and for that, tools need to be customized to fit. For every 10 contractors, there are 8 different ways to get the job done. You’ll learn below, the importance of custom tools and the benefits of saving your takeoffs to use during construction. These same markups are used to streamline material delivery and minimize risk. Let’s dive in and take a look.
My last article, “5 Ways Concrete Contractors Get the Most Out of Bluebeam Revu“ spoke about revisions, scope changes, and QA/QC. Each of these applies to every contractor on the Jobsite. So after you read about these three ways framing contractors are winning, go back and apply those as well. Here are those 3 ways:
- Visual Material Takeoff Tools
- Just In Time Delivery
- Risk Management
Visual Material Takeoff Tools
As you know I don’t spend a lot of time showing how out-of-the-box tools work in Revu. I try to show how tools can be twisted to do more. I love learning legacy workflows from customers and the challenge of creating a digital version with any applicable best practices. So let’s take a look at some tools I’m working on for a high-end residential builder. With all the variables in framing, from wall thickness to materials, my mind immediately began reverse engineering. Always starting with the end in mind, I want to make the markups as simple as possible. We also want to make sure the output is as detailed as we need to place an accurate material order. I quickly recommended Quantity Link to get the detailed results they require in their lumber takeoffs.
*Custom Tools
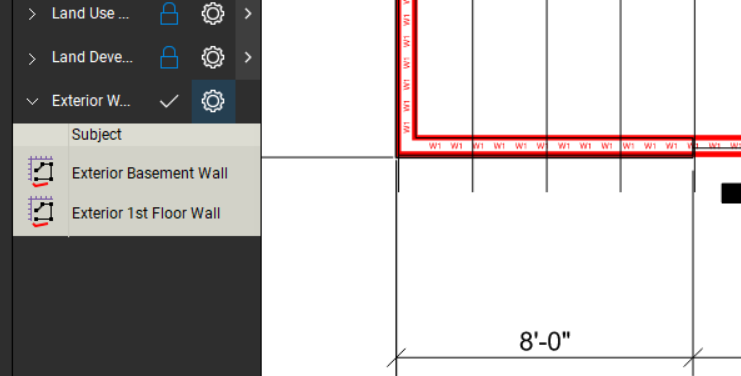
First, let’s build some simple tools in Bluebeam to be able to highlight walls on the plan. In this case, I’m keeping them generic because the complexity is going to be built in Excel. I created 10 wall tools using the PolyLength measurement tool. This will get me the linear footage of each different wall type on a project.
*Custom Layers
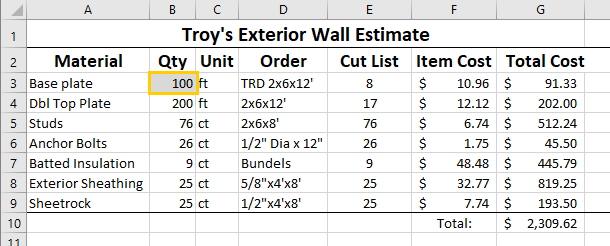
Next, I need to embed layers into those tools signifying when walls will be constructed. For example, basement framing and the first cap will be on the basement layer. By combining the first-floor structure and its bearing walls, we complete a level. Second-floor and first-floor framing is next completing another full level, and so on. In the image below you can see two of the wall markups I created as an example. Each wall is clearly named including the level of construction.
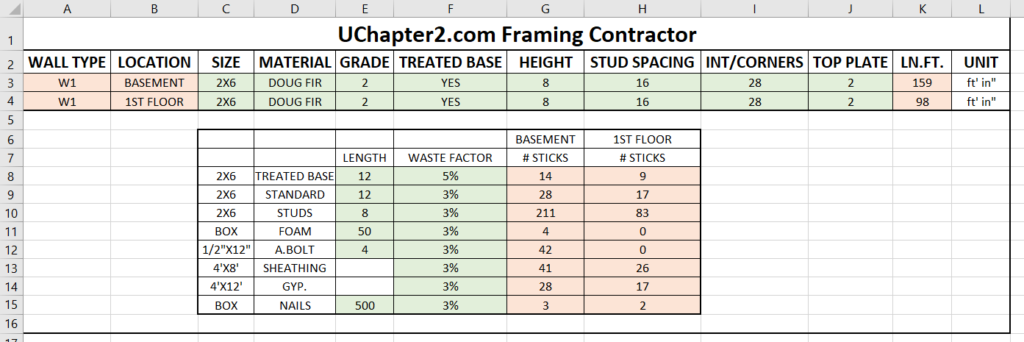
Once the tools are created, we build out our Excel template file and start linking cells with Quantity Link. Building all the intricate details as menus we can dial in what materials are required in the assembly. As a reminder, Quantity Link is a feature only in Revu Extreme. Below you can see Green cells which require menu selection to define the makings of the W1 wall type. The Red cells are not to be messed with, they have linked data or formulas embedded.

Just in Time Delivery
Optimizing deliveries is easy with the tools we’ve built. Those layers we created can be filtered to place a lumber order at each level. Why would we have it all delivered before the foundation is finished? Let’s just have the basement framing and first cap material delivered, and next week we’ll get second-floor framing and cap. Because we started with smart tools, we can adjust what we want visible. With no extra effort, at any phase of framing, we can adjust what we want to see on the drawings.

Risk Management
Risk Management also becomes a bi-product of these takeoff tools. When correct materials are delivered, at just the right time, the potential damage is reduced. This also gives the lumber has less time to grow legs. The marked-up plans clearly layout what goes where assuring the layout of the estimator matches what’s constructed. I’ve heard the stories of 10-foot headers being cut in half and used on other window openings. This leaves the crew waiting for new material to be delivered. Why not use the drawings we already have?
I think we should jump into a video to pull all this together!
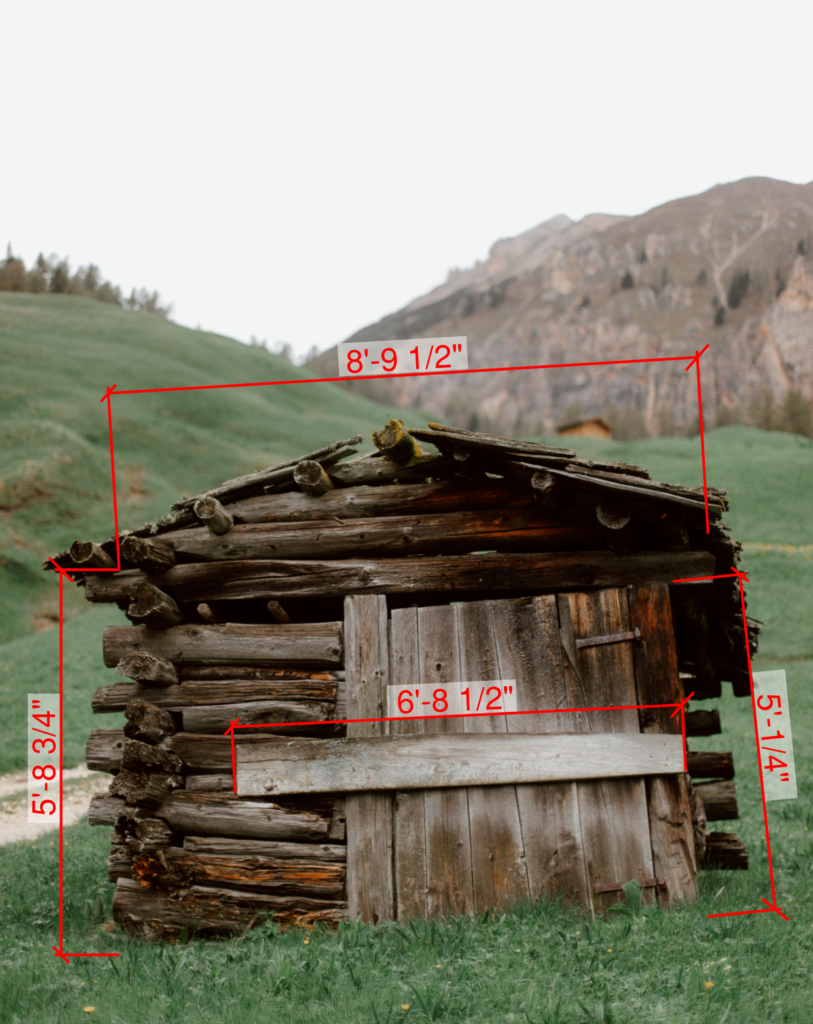
You could also get rough dimensions from a photo if you’re working on an addition or remodel project. Some images are better than others. 🤣
As you can see Bluebeam Revu tools have framing contractors winning from Bid to Built. If you have any questions about custom tools and workflows for your business, let’s jump on a call. It’s about time we build some standardization, consistency, and risk management into your company takeoff tools.
For more information on this topic, Click Here for a parallel article written for Bluebeam.
[…] Whether you’re timber framing single-family homes, multi-family residential or steel stud commercial tenant improvement, this article applies to you. If you’re interested in seeing the more technical side of these workflows in action, check out my article. […]
[…] Whether you’re timber framing single-family homes, multi-family residential or steel stud commercial tenant enhancement, this article applies to you. If you’re interested in seeing the more technical side of these workflows in action, check out my article. […]
[…] Sie sich für die technischen Aspekte dieser Arbeitsabläufe interessieren, empfehle ich Ihnen meinen Artikel […]
[…] Oavsett om du bygger eller renoverar enfamiljshus, flerbostadshus eller kommersiella fastigheter, med trä- eller stålkonstruktion, är den här artikeln relevant för dig. Om du är intresserad av att se de den mer tekniska sidan av de här arbetsflödena i praktiken, läs den här artikeln. […]
[…] Whether you’re timber framing single-family homes, multi-family residential or steel stud commercial tenant improvement, this article applies to you. If you’re interested in seeing the more technical side of these workflows in action, check out my article. […]
I appreciate SolidCAD sharing these articles and educating the industry. Please let me know if you ever have any questions for me and the services I might be able to partner with for your customers. For a lot of resellers, I provide customization services and training while not being on their payroll in the downtime. Either way, I wanted to point out that in this particular article, you only Pasted the first half of the article. Just in case you want to update to provide the entire thing. Thanks again, reach out anytime at troy.degroot@uchapter2.com! Troy DeGroot UChapter2