Understanding Revu Layers Like A Pro

Over the next three weeks, I’ll be publishing a series of blog posts in an attempt to cover all things Layers in Bluebeam Revu. I hope you’ll subscribe and join me. This week, I just want to get everyone familiar with Layers and a few ways they are used. In the coming weeks, we’ll learn “4 Ways to Create Layers in Bluebeam Revu” followed by “How To Use & Manage Layers in Revu – A Quick Rundown.” By the end of this series, you’ll understand Bluebeam layers like a pro.
So what’s the big deal about layers? Why spend three weeks on it?
Here’s what we’re going to cover in this post:
- What are Bluebeam Layers?
- Tips For Using Layers in Bluebeam.
- Bluebeam AutoCAD layers.
- Common Questions Regarding Layers in Bluebeam Revu.
- Is there a Bluebeam layers tutorial?
- How to Layer Drawings in Bluebeam.
- Use Case Examples.
- Organizing Field Data.
- Estimates for Material Types.
Let’s start peeling back the layers on layers!
What Are Bluebeam Layers?
Layers are a simple way to add a lot of information and markups to the drawings. Hiding or isolating markups allows us to communicate clearly in an organized way.
Tips for Using Layers in Bluebeam Revu
With over 20 years in production doing structural design, I worked my way to a BIM Manager position (Building Information Modeling). I learned a lot about implementing three-dimensional workflows in a large multi-discipline engineering firm. One thing I learned, I carry with me into every tool, every implementation, every customer.

I like to build tools and workflows that cause users to trip into correctly following company standards. They have to go out of their way to do it wrong. Layers are one of those things we can create and implement, even if the user doesn’t know anything about them, we’re right around the corner making sure standards are followed.
I’m pretty sure I’m not the only person in the industry who likes systematic procedures to ensure we’re all rowing in the same direction.
AutoCAD Layers in Bluebeam
What do we do when layers from AutoCAD are bogging down my PDF’s?
There are a few ways to remove layers from pdf Bluebeam.
- Flattening the document is usually the first recommendation. On the menu bar click on Document > Flatten (Ctrl+Shift+M). To learn more about the flexibility of Flattening, reference my recent article published in Bluebeam’s Built Blog.
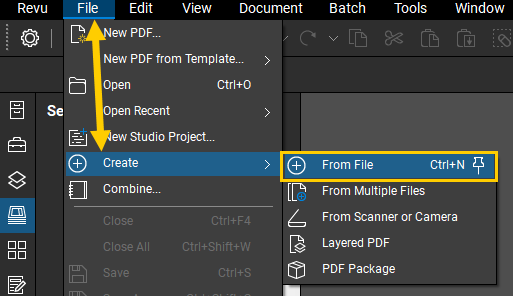
- There’s another option in the menu bar under File > Create > From File (Ctrl+N). With this one, you point to the original pdf file with layers and Revu will create a brand-new pdf from the original cleaning up metadata, layers and other unneeded information.
Common Questions
How to Layer Drawings in Bluebeam?
To layer entire drawings over top of each other, we’ll use a tool called Overlay Pages. This is like the old light tables shinning through paper documents. We used to use those to see if stair, elevator, and mechanical shafts lined up from floor to floor (before 3D modeling)
Click here to see one of my previous videos where I show Overlay Pages combined with Document Compare. If you haven’t seen this one, hang out for the tip at the end where I merge both to show where the changes are with clouds, and what changed on the same sheet. It’s the old interface (pre-2018), but everything works the same.
Is there a Bluebeam layers tutorial?
Bluebeam’s Technical Support website is always a great place to find step-by-step directions for using each tool, this link will bring you to the layers section. You can also find technical support under the Help menu in Revu. In the coming weeks, I will be publishing a few videos as well to put my spin on things. Check out all my videos!
Use Case Examples
Organize field data.
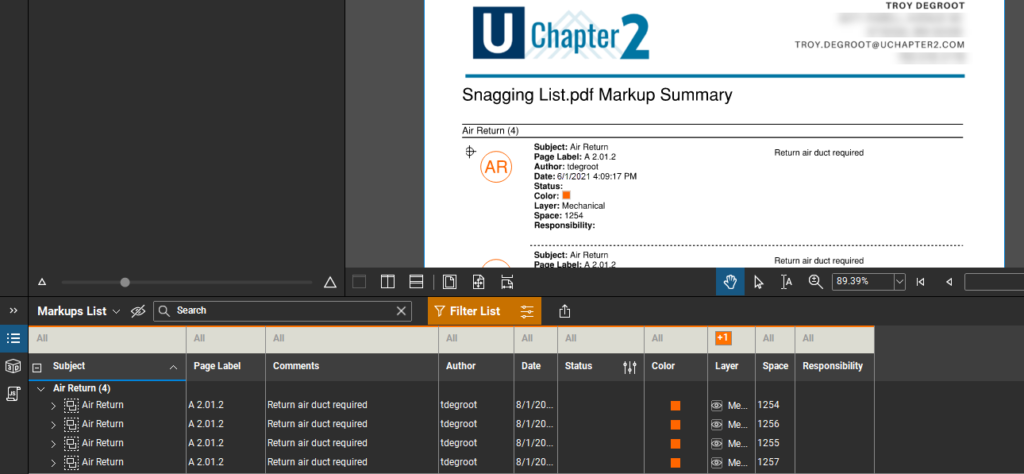
- In the example above I set the layer configuration to only one discipline. Let’s set that so we can only see Mechanical markups.
- Next, we can filter the Markups List to only show the Mechanical markups, reducing the length of the list and allowing us to notify our mechanical contractor of the markups that concern their team.
- Now that I have the drawing and the markups list only showing Mechanical markups, I can run a Markup Summary that clearly shows and describes the changes falling under the mechanical contractors responisibility.
Estimates for material types.
- Let’s say it’s Friday afternoon, you’ve worked all week and the weekend is calling your name. The only thing between you and family/golf/lake is a bid you need to get out, and you’re way behind. Custom tools with layers built-in means you can buzz through the drawings scaling out all the isolated footings while other team members help out capturing strip footings, walls, and curbs. Layers can be clean and isolated during the markup phase, but the totals are all collecting in the markup list even when layers are hidden in the drawing.
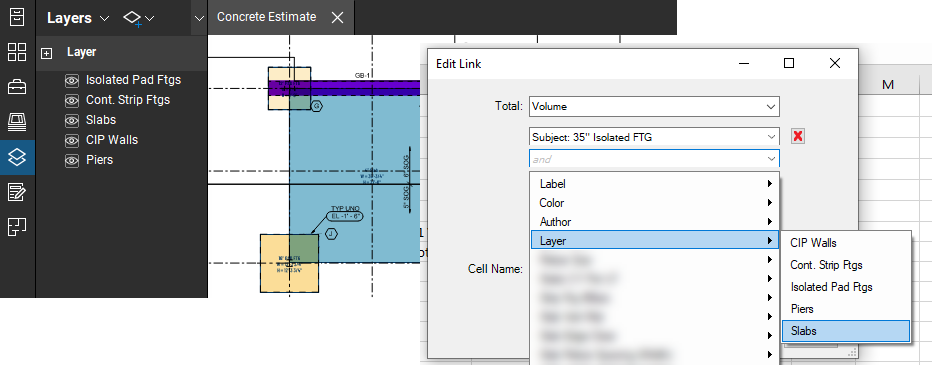
- If you’re building an estimate using Quantity Link you can use the layer as one of the filters in Excel. Meaning you can get the quantity of an element assigned to a specific layer. Maybe you have a concrete slab, but you want to differentiate them by hand finish or mechanical because the pricing is different. Or maybe including Fiber Mesh in certain slabs and not others. Layers are a way to isolate them when pulling information from Bluebeam markups into your spreadsheet.
In summary, layers are a big deal for many reasons, so I’ll take three weeks to cover it. If I’m going to take the time to talk about them, I’ll do my best to not leave any stones unturned. You’ll have no problem understanding Bluebeam layers like a pro. (Stay tuned, Quantity Link is my next focus).
If you need help incorporating Layers into your workflows, or have any customization services questions, don’t hesitate to reach out. Contact me.
For more information on this topic, Click Here for a parallel article written for Bluebeam.


[…] To learn more about layers check out, “Understanding Revu Layers Like a Pro.” […]
[…] To learn more about layers check out my other blog post, “Understanding Revu Layers Like a Pro.” […]
[…] mehr über Ebenen zu erfahren, lesen Sie meinen anderen Blogbeitrag „Understanding Revu Layers Like a Pro“ (Revu-Ebenen verstehen wie ein […]
[…] To learn more about layers check out my other blog post, “Understanding Revu Layers Like a Pro.” […]
[…] To learn more about layers take a look at my other blog post, ‘Understanding Revu Layers Like a Pro.’ […]
[…] Om du vill veta mer om lager kan du läsa mitt andra blogginlägg, Understanding Revu Layers Like a Pro (engelska). […]
[…] du vide mere om lag, kan du også læse mit andet blogindlæg, “Understanding Revu Layers Like a Pro” […]
[…] power poles, data connections, ceiling-mounted projectors and wall-mounted screens. By creating a layer system in Bluebeam, you can hide or isolate each of these individually, making the plans much more […]
[…] power poles, data connections, ceiling-mounted projectors and wall-mounted screens. By creating a layer system in Bluebeam, you can hide or isolate each of these individually, making the plans much more […]
[…] läggs till kan en kontorslayout bli fullbelamrad och rörig. Om du skapar ett system med lager i Bluebeam kan du dölja eller isolera varje enskilt lager, och på så sätt göra ritningarna […]
[…] power poles, data connections, ceiling-mounted projectors and wall-mounted screens. By creating a layer system in Bluebeam, you can hide or isolate each of these individually, making the plans much more […]