4 Ways to Create Layers in Bluebeam Revu

Last week we kicked off a three-week series attempting to cover all things Layers in Revu. If you missed it, get caught up with “Understanding Revu Layers Like A Pro”. This week we are going to learn how to create layers in Bluebeam Revu and I’ll show you 4 different ways to create them in this post. You’ll want to make sure you practice creating layers this week because next week we’re covering “How To Use & Manage Layers in Revu – A Quick Rundown.”
Creating Layers in Bluebeam Revu is one of the quickest and easiest ways to organize your markups and project data. Similar to layers in CAD software like AutoCAD you can isolate or hide content to reduce clutter and focus on particular markups.
Let’s dive into 4 ways to create layers in Revu.
To properly set the table, even though Revu has an incredible array of tools, it’s not intended to be a drafting tool like these other CAD systems.
(but we all know, it’s frustratingly close)
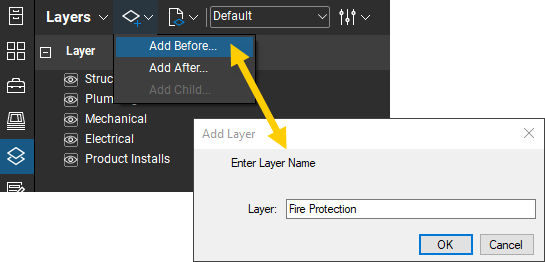
1. Creating Layers From The Layers Panel.
- On the left side of the interface, you’ll see Tabs for individual Panels, click on the Layers Tab to expand the Layers Panel.
- Along the top of the panel click on the Add Layer button and select whether you want your new layer Before or After the existing layers.
- Once you select where you want the layer, it will prompt you to enter a layer name. After the layer is created, you’ll notice it’s greyed out in the list. This is because there are no markups assigned to the layer on this sheet.
- If you want to create a Bluebeam child layer of the parent, simply right-click on the layer in the list and select Add Child. An example of this might be a “Civil” Parent Layer with child layers named “Cut” and “Fill”. This would allow you to hide the “Cut” markups, the “Fill” markups, or all of them by hiding “Civil”
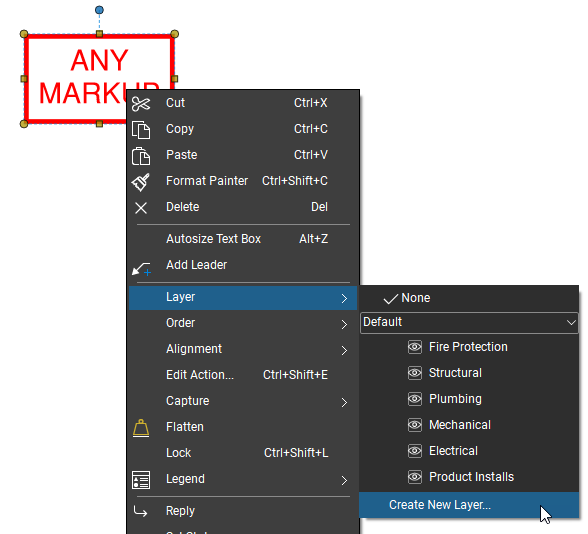
2. Right-Click Options.
- Select a markup or group of markups, and right-click.
- In the resulting menu, pick on Layer.
- From here you can select an existing layer to send the markups to, or click Create New Layer.
- When prompted, name the new layer and see it added to the list in the layers panel. You’ll also see those selected markups have been assigned to the new layer.
- If you right-click on a layer in the layer panel, you can select Markup Layer. That layer will then be set to the current layer as the default for all markups going forward.
3. Embed Layers Into Custom Tools.
This is my favorite way to create standards and consistent layer naming and usage. When building custom tools for customers, I always build layers into the tools. This way when they use the custom markup tools the layers are automatically created and properly assigned. The easiest way to create layers is to let them create themselves!
4. Copying Layers To Another PDF.
If you’re not embedding layers in your custom tools, the quickest way to create several layers in a new PDF is to create a “Layers Template.pdf” with all the layers represented by some sort of markup. You can quickly Pin this document into a category in the File Access Panel for quick reference. When you want to insert layers into a new PDF, simply drag & drop the “Layers Template.pdf” document into the thumbnail section of the new PDF. Once you see the layers have loaded, just erase the template sheet. Check out the quick video I did to show how easy it is to import layers into Bluebeam Revu.
Note:
- Because there are no markups on those layers they will grey out, but they still exist in the document.
- Any child layers you have will transfer but no longer be a child of another.
- Layer Groups do not remain grouped when imported.
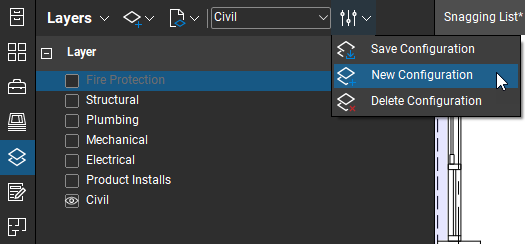
Bluebeam Layer Configurations.
Just like AutoCAD, we can create Bluebeam layer configurations to set up pre-determined views or Bluebeam layer groups.
- In the layers panel, turn on or off the layers to create the desired view.
- Click the Properties button and select New Configuration and assign a name. In this example, I created configurations to isolate each discipline.
Layers In a Studio Session.
I’m asked over and over, “How do I go about adding layers in a Bluebeam Studio Session?”
It should be noted, you’re not able to create layers when inside a Studio Session. This is a change to the document itself (not the markups) so it’s not allowed. Even if you’re using custom tools with built-in layers they will not generate the layer. You need to make sure the desired layers exist in the document prior to uploading to the Studio Session. Refer to #4 above!
Some Other Settings To Consider.
There are setting allowing us to print (or not), locking them so nobody can modify them accidentally, or setting them to export (or not). If you drag out the Layers Panel you‘ll see a column for Locking, Print, and Export. Simply check the boxes for each layer to perform the way you want.
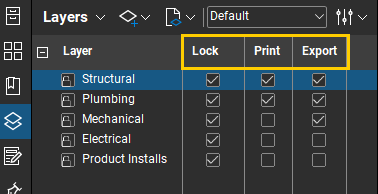
Why would you do this? Sometimes your internal team markups are not meant for the external teams to see (pricing data), you can set those to not print. I like to create standard tools for internal teams, put them on an “Internal” layer, and uncheck the box under “Print”. This way whether I print a new PDF or a physical sheet, none of the internal markups will be on my prints. This is similar to the Defpoints layer in AutoCAD.
Next week I’ll give a quick rundown of all the ways we can utilize layers in our workflows as we discuss Managing Layers in Bluebeam Revu. In the meantime, jump over and join the Brainery, my free user groups & forums to learn more. If you have any questions on how to create layers in Bluebeam Revu, don’t be shy and ask the UC2 community. Either a Brainery member or myself will answer them.
If you need help incorporating Layers into your workflows, or have any customization services questions, don’t hesitate to reach out. Contact me.


Responses