• Forums
    • UC2 Brainery Forums
    • UC2 Brainery Groups
    • Log In
    • Join The Community
  • Courses
  • Resources
    • Bluebeam Company Use Assessment
    • UC2 Newsletter Signup
    • All UC2 Events
    • UC2 Bluebeam Blog
    • Bluebeam Training Videos
      • Learning Paths
    • Free Downloads
      • Hatch Patterns
      • Bluebeam Tool Sets
    • FAQ’s
  • Blog
  • Contact us
    • Contact us
    • Get Help ASAP
    • About
    • Testimonials
      • Submit a Testimonial
    UC2_LOGO__350x131
    Sign in Sign up
    UC2_LOGO__350x131
    UC2_LOGO__350x131
    • Forums
      • UC2 Brainery Forums
      • UC2 Brainery Groups
      • Log In
      • Join The Community
    • Courses
    • Resources
      • Bluebeam Company Use Assessment
      • UC2 Newsletter Signup
      • All UC2 Events
      • UC2 Bluebeam Blog
      • Bluebeam Training Videos
        • Learning Paths
      • Free Downloads
        • Hatch Patterns
        • Bluebeam Tool Sets
      • FAQ’s
    • Blog
    • Contact us
      • Contact us
      • Get Help ASAP
      • About
      • Testimonials
        • Submit a Testimonial

    Category: Tips & Tricks

    Bluebeam Revu for Interior Design Feature Image-UChapter2

    Bluebeam Revu For Interior Design

    Visually appealing designs, Accurate Counts & Easy Install There is no better scenario than having high-quality deliverables helping the client visualize their new space, and…

    Troy DeGroot November 2, 2022
    2 Comments
    Free Bluebeam Revu Toolsets

    FREE Bluebeam Revu Toolsets

    After months of working on these FREE Bluebeam Revu Toolsets, they’re finally available for download. From Appliances to Weld Symbols and everything in between. Some…

    Troy DeGroot May 5, 2022
    2 Comments
    Bluebeam XCON 2021 Post Event Summary Report

    Bluebeam XCON 2021 Conference Post Event Summary Report

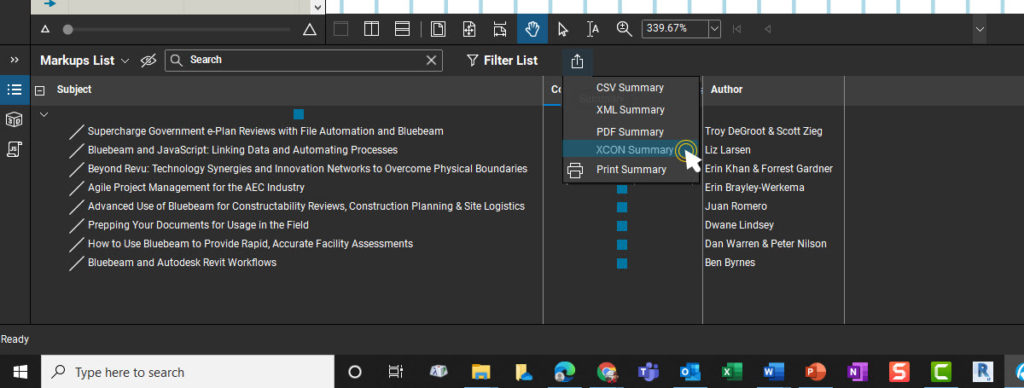
    What a great time again this year at Bluebeam’s XCON 2021 conference. The team at Bluebeam always does a fantastic job planning and executing the…

    Troy DeGroot October 5, 2021
    0 Comments
    Building assemblies for estimating and material cut lists

    Advanced Use Cases for Quantity Link in Bluebeam Revu

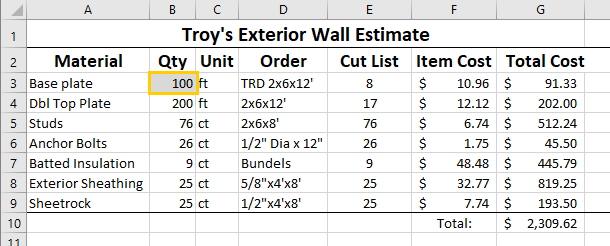
    Let’s take those Quantity Link connections a bit further this week. I want to follow up with some advanced use cases for Quantity Link by…

    Troy DeGroot August 20, 2021
    0 Comments
    Quickly create layers in Bluebeam Revu

    4 Ways to Create Layers in Bluebeam Revu

    Last week we kicked off a three-week series attempting to cover all things Layers in Revu. If you missed it, get caught up with “Understanding…

    Troy DeGroot July 22, 2021
    0 Comments
    Understand Layers in Revu Like a Pro

    Understanding Revu Layers Like A Pro

    Over the next three weeks, I’ll be publishing a series of blog posts in an attempt to cover all things Layers in Bluebeam Revu. I…

    Troy DeGroot June 30, 2021
    10 Comments
    Auto-Fill Driving you Crazy in Bluebeam Revu - Bluebeam Training

    Auto-Fill Driving you Crazy in Bluebeam Revu?

    If you are a heavy Bluebeam Revu 2018 user or build a lot of custom tools like I do, you probably end up with a…

    Troy DeGroot July 11, 2019
    1 Comment
    Quickly hyperlink all your sections and elevations with Bluebeam Revu - Bluebeam Training - Document Management

    Can Hyperlinks in Revit be used in PDF documents?

    One of my favorite things about Revit is the active links allowing you to navigate drawing sets by simply double-clicking the sections and elevations to…

    Troy DeGroot June 10, 2019
    0 Comments
    When I try to highlight something in Bluebeam it highlights everything - Bluebeam Training

    Highlighting Issue in Bluebeam Revu

    When I try to highlight something on my drawing it highlights the entire sheet! There are two types of PDF drawing files, Vector and Raster. …

    Troy DeGroot June 3, 2019
    5 Comments

    Quickly open and close PDF documents with Bluebeam Revu.

    If you have several drawing tabs open and want to quickly close them, right click on a tab you want to keep.  In the resulting…

    Troy DeGroot May 24, 2019
    0 Comments
    Load More

    Subscribe to our newsletter

    Don't miss new updates in your email

    Recent Posts

    • Land Development Bluebeam Tools of the…

    • Installing Custom Profiles in Bluebeam Revu

      Installing Custom Profiles in Bluebeam Revu

    • Part 2, The 4 Evolutionary Stages…

    See all

    Categories

    U CHAPTER 2

    • Home
    • UC2 Brainery
    • UC2 Courses
    • Resources
    • About UC2
    • Contact Us

    UC2 COMMUNITY

    • Become A UC2 Member
    • All UC2 Events
    • UC2 Brainery Groups
    • UC2 Brainery Forums
    • UC2 Brainery Members
    • UC2 Newsletter Signup

    UC2 MEMBER LINKS

    • Log In
    • Register

    Search

    © 2023 - U Chapter 2
    • Privacy Policy
    • Terms and Conditions

    Website by KPI Marketing

    Forum Description

    Visually appealing designs, Accurate Counts & Easy Install

    There is no better scenario than having high-quality deliverables helping the client visualize their new space, and streamlining an accurate count, delivery, and installation. With Bluebeam Revu there are several tools we can use to track fixture counts and locations. As with every article, it seems I write, colors, layers and custom toolsets are key to efficient, consistent workflows in Bluebeam Revu. Interior Design is no different, however, I’d like to touch on Digital Dashboards and a few other tools:
    • Spaces
    • Search Panel
    • Legends
    Spaces I've written about Spaces in past articles where thinking outside the box, I used them in estimating things like storefront glass or other materials that are fabricated offsite and assembled in the field. What Spaces are more commonly used for is designating an area, and reporting everything you place inside of them. Creating a Space is as easy as tracing the shape and giving it a name.  
    • On the Left Panel, right-click > Show and select Spaces (Alt+S) this will turn on the Spaces Panel and display a few buttons across the top.
    • Click on the Add Space button and draw inside a specific room or area of the drawing by picking on the corners or click & drag a rectangle.
      • You can also use Dynamic Fill, or the Revit Plugin to automaticly create Spaces.
    • Once the shape is complete, Revu will ask you to give the space a name. Type in the room number as an example.
    • Make sure you turn on the Spaces Column in the Markups List and notice as you place markups inside that room they're allocated properly by room.
    Search Panel One tool that catches the attention of users every time I demonstrate is the search functions. With both a Text and Visual Search, we can find and count elements on our drawings very quickly. All we have to do is tell Revu what to look for. The quality of the documents is definitely a factor in how successful these tools perform. Always use Vector drawings printed directly from design software, when possible. Text Search
    • On the Right Panel, right-click > Show Search (Alt+1) this will turn on the Search Panel and display two tabs across the top. One is for Text Search, the other is for Visual Search.
    • On the Text Tab, simply type in the letters, numbers, or combinations you’re looking for. In this case a specific chair designation C7.
    • Be sure to check the "Whole Words Only" option or your results will include everything containing C7 ( C7.2 or C7.B for example).
    • Notice after Revu performs the search, a list of each instance will be shown so you can verify each one. Simply check the box at the top to select all.
    • On the Select Options, we're going to Apply Count Measurement to Checked. A window tool menu will appear with generic count symbols or any custom tools from our Toolsets.
    Visual Search
    • Clicking on the Visual Tab at the top of the Search Panel you’ll see similar options. This time click on the Get Rectangle button on the upper right.
    • Next, draw a window around a symbol you wish to find all instances of in the drawing. Notice the preview appears in the display window of the panel.
    • Clicking the Search button will start Revu looking through the drawing for that exact pixel layout. I like to have the Sensitivity set really low in the Options and also turn on Search Multiple Rotations just in case.
    • Just like in the steps above, each instance will be shown. You can select them and Apply Count Measurement to Checked same as above.
    Legends There’s no doubt Revu makes it simple to track rich data in the Markups List, but sometimes it's more important to provide accurate information directly on the drawing. Let’s face it, not everyone in the project lifecycle has the luxury of looking at a digital document in Revu. Whether it’s the customer, the warehouse, or the installers we can provide clean accurate information for everyone involved. Legends can be created in several ways depending on the desired results. What’s my favorite way to create Legends? I like to be strategic about how I built my Toolsets so I can create Legends to match. If you click on the Properties gear at the corner of the Toolset, you can create a Legend of just the items in that Toolset. As with all Legends, it will only display markups that are on the document (and not flattened). Quickly create legends to report fixture counts
    • Once you place the Legend on the sheet don’t forget to look at the Properties Panel to set the Table Style to Gridlines, update a proper title, and other cosmetic preferences.
    • Click on the Edit Columns button to select which columns to display in which order.
    • Once the Legend looks correct, right-click and Set as Default. This way all the future Legends will have the same fonts, line weights, etc.
    • Bonus Tip, right-click again and Add To Tool Chest. Now your Legend lives with your Tools.
    Digital Dashboards Where do I even start with Digital Dashboards? These are so powerful, fun to build, and look amazing. I'd like to dedicate an entire blog post to Digital Dashboards at some point, but here are a couple of highlights to get your feet wet.
    • Start with a PowerPoint theme you like, whether it’s a company standard including logos and brand colors, or just one of the many templates within the program, this is a great way to get a really nice-looking Dashboard.
    • Fill in titles, text, graphics, whatever you need to set the stage for each or all pages. Yes, Page(s)
    • Then Print to PDF. Many times, the formatting is different by default displaying a white bar across the top and bottom of the PDF. I use the Batch Crop tool to quickly eliminate these from all pages.
    • Next using various markup tools, you can create buttons, and arrows, or in this case create frames to later add images.
    • Finally start adding Actions to the markups, by hyperlinking to different pages, documents, network locations, or websites.
    As always, you can check out the video version of this blog. [embed]https://youtu.be/S45lVAuJwvE[/embed] I hope highlighting a series of specialty contractors is helpful. Whether this is an exact match to your specialty, or you draw inspiration to your workflows, I'm happy to help in whatever capacity. Having built custom tools and workflows for hundreds of companies, I may have already worked with your peers and could easily apply best practices to your workflows. A quick call can kick things off. For more information on this topic, Click Here for a parallel article written for Bluebeam.

    Report

    There was a problem reporting this post.

    Harassment or bullying behavior
    Contains mature or sensitive content
    Contains misleading or false information
    Contains abusive or derogatory content
    Contains spam, fake content or potential malware

    Block Member?

    Please confirm you want to block this member.

    You will no longer be able to:

    • See blocked member's posts
    • Mention this member in posts
    • Invite this member to groups
    • Message this member
    • Add this member as a connection

    Please note: This action will also remove this member from your connections and send a report to the site admin. Please allow a few minutes for this process to complete.

    Report

    You have already reported this .