Bluebeam Revu For Interior Design

Visually appealing designs, Accurate Counts & Easy Install
There is no better scenario than having high-quality deliverables helping the client visualize their new space, and streamlining an accurate count, delivery, and installation. With Bluebeam Revu there are several tools we can use to track fixture counts and locations. As with every article, it seems I write, colors, layers and custom toolsets are key to efficient, consistent workflows in Bluebeam Revu. Interior Design is no different, however, I’d like to touch on Digital Dashboards and a few other tools:
- Spaces
- Search Panel
- Legends
Spaces
I’ve written about Spaces in past articles where thinking outside the box, I used them in estimating things like storefront glass or other materials that are fabricated offsite and assembled in the field. What Spaces are more commonly used for is designating an area, and reporting everything you place inside of them. Creating a Space is as easy as tracing the shape and giving it a name.
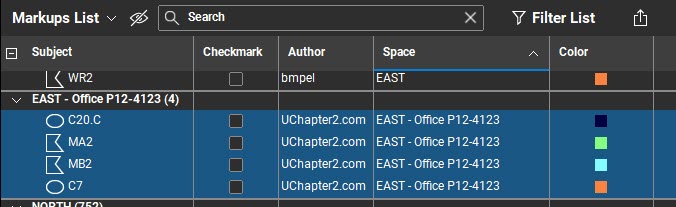
- On the Left Panel, right-click > Show and select Spaces (Alt+S) this will turn on the Spaces Panel and display a few buttons across the top.
- Click on the Add Space button and draw inside a specific room or area of the drawing by picking on the corners or click & drag a rectangle.
- You can also use Dynamic Fill, or the Revit Plugin to automaticly create Spaces.
- Once the shape is complete, Revu will ask you to give the space a name. Type in the room number as an example.
- Make sure you turn on the Spaces Column in the Markups List and notice as you place markups inside that room they’re allocated properly by room.
Search Panel
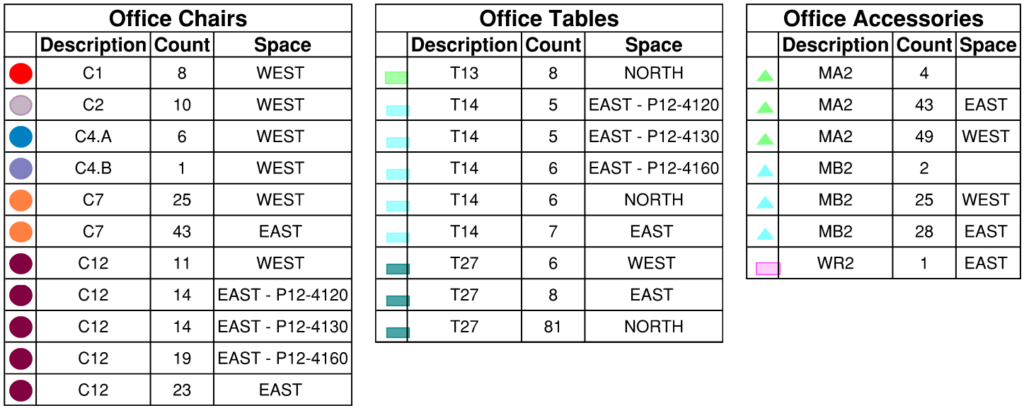
One tool that catches the attention of users every time I demonstrate is the search functions. With both a Text and Visual Search, we can find and count elements on our drawings very quickly. All we have to do is tell Revu what to look for. The quality of the documents is definitely a factor in how successful these tools perform. Always use Vector drawings printed directly from design software, when possible.
Text Search
- On the Right Panel, right-click > Show Search (Alt+1) this will turn on the Search Panel and display two tabs across the top. One is for Text Search, the other is for Visual Search.
- On the Text Tab, simply type in the letters, numbers, or combinations you’re looking for. In this case a specific chair designation C7.
- Be sure to check the “Whole Words Only” option or your results will include everything containing C7 ( C7.2 or C7.B for example).
- Notice after Revu performs the search, a list of each instance will be shown so you can verify each one. Simply check the box at the top to select all.
- On the Select Options, we’re going to Apply Count Measurement to Checked. A window tool menu will appear with generic count symbols or any custom tools from our Toolsets.
Visual Search
- Clicking on the Visual Tab at the top of the Search Panel you’ll see similar options. This time click on the Get Rectangle button on the upper right.
- Next, draw a window around a symbol you wish to find all instances of in the drawing. Notice the preview appears in the display window of the panel.
- Clicking the Search button will start Revu looking through the drawing for that exact pixel layout. I like to have the Sensitivity set really low in the Options and also turn on Search Multiple Rotations just in case.
- Just like in the steps above, each instance will be shown. You can select them and Apply Count Measurement to Checked same as above.
Legends
There’s no doubt Revu makes it simple to track rich data in the Markups List, but sometimes it’s more important to provide accurate information directly on the drawing. Let’s face it, not everyone in the project lifecycle has the luxury of looking at a digital document in Revu. Whether it’s the customer, the warehouse, or the installers we can provide clean accurate information for everyone involved. Legends can be created in several ways depending on the desired results.
What’s my favorite way to create Legends? I like to be strategic about how I built my Toolsets so I can create Legends to match. If you click on the Properties gear at the corner of the Toolset, you can create a Legend of just the items in that Toolset. As with all Legends, it will only display markups that are on the document (and not flattened).
- Once you place the Legend on the sheet don’t forget to look at the Properties Panel to set the Table Style to Gridlines, update a proper title, and other cosmetic preferences.
- Click on the Edit Columns button to select which columns to display in which order.
- Once the Legend looks correct, right-click and Set as Default. This way all the future Legends will have the same fonts, line weights, etc.
- Bonus Tip, right-click again and Add To Tool Chest. Now your Legend lives with your Tools.
Digital Dashboards
Where do I even start with Digital Dashboards? These are so powerful, fun to build, and look amazing. I’d like to dedicate an entire blog post to Digital Dashboards at some point, but here are a couple of highlights to get your feet wet.
- Start with a PowerPoint theme you like, whether it’s a company standard including logos and brand colors, or just one of the many templates within the program, this is a great way to get a really nice-looking Dashboard.
- Fill in titles, text, graphics, whatever you need to set the stage for each or all pages. Yes, Page(s)
- Then Print to PDF. Many times, the formatting is different by default displaying a white bar across the top and bottom of the PDF. I use the Batch Crop tool to quickly eliminate these from all pages.
- Next using various markup tools, you can create buttons, and arrows, or in this case create frames to later add images.
- Finally start adding Actions to the markups, by hyperlinking to different pages, documents, network locations, or websites.
As always, you can check out the video version of this blog.
I hope highlighting a series of specialty contractors is helpful. Whether this is an exact match to your specialty, or you draw inspiration to your workflows, I’m happy to help in whatever capacity. Having built custom tools and workflows for hundreds of companies, I may have already worked with your peers and could easily apply best practices to your workflows. A quick call can kick things off.
For more information on this topic, Click Here for a parallel article written for Bluebeam.

[…] The interior designers responsible for this magic not only work to capture the look and feel of the indoor built environment, but they also consider traffic flow, occupancy restrictions and other code compliancy. If you’re interested in the how-to technical side of the tools below, check out my blog, “Bluebeam Revu for Interior Design.” […]
[…] Indretningsarkitekterne, der står bag magien, arbejder ikke kun med udseendet og følelsen af indemiljøet. De tager også hensyn til trafikstrømmen, begrænsninger for beboere og andre lovkrav. Hvis du er interesseret i den tekniske side af værktøjerne nedenfor, kan du læse min blog “Bluebeam Revu for Interior Design.” […]
[…] Belegungsbeschränkungen und die Einhaltung von Vorschriften. In meinem Blogbeitrag „Bluebeam Revu für Innenarchitekt:innen“ finden Sie weitere Informationen zu den technischen Aspekten der unten aufgeführten […]
[…] The interior designers responsible for this magic not only work to capture the look and feel of the indoor built environment, but they also consider traffic flow, occupancy restrictions and other code compliancy. If you’re interested in the how-to technical side of the tools below, check out my blog, “Bluebeam Revu for Interior Design.” […]