Attention Specialty Contractors!
Did you know estimates for assemblies are possible in Bluebeam Revu?
Recently, I had the honor of writing the article below directly for Bluebeam’s Built publication. Click here to see the original and be sure to subscribe as well to see stories from the global industry.
Since becoming a Bluebeam Certified Instructor with the inaugural class in 2015, I’ve trained thousands of students and built workflows and tools for a long list of companies, and cities. Each one with different goals in mind. Custom tools from industry workflows and Digital Plan Review to searching for utility bills on my annual credit card summary for taxes to Inductive Study methods of understanding the Bible to the design of my tattoo, I truly feel the only limit in Bluebeam is our creativity.
The idea of assemblies in Bluebeam Revu is something I’ve never heard anyone talk about. One thing I know about Bluebeam Revu, if you say there has to be a way, chances are there is. With a little creativity and the flexibility of Bluebeam Revu tools, it’s absolutely possible and I’ll show you. I came up with the following custom tools and workflows, and I think you’ll be surprised with the end results. Make it all the way to the bottom for a Bonus Tip and corresponding video. Let me know what you think in the comments. Are you a specialty contractor, could this work for your products?
Attention Specialty Contractors!
Did you know estimates for assemblies are possible in Bluebeam Revu?
It’s no secret that Bluebeam Revu is among the most powerful software tools used in the design and construction industry. As I’ve observed in my career as a Bluebeam Certified Instructor and blogger, construction professionals of all specialties and trades are using specific features and tools in Revu to maximize efficiency in their workflows. I’ve teamed up with Built, the Bluebeam Blog, to contribute a series of articles on how professionals across the industry can get more value out of Revu.
As technology has fast become the standard for the industry, specialty contractors are not far behind. In fact, specialty contractors can build custom tools to bid, track installs and QA/QC jobsite walks—all in one drawing.
Let’s start by tackling the bid part. For this example, let’s pretend we’re a commercial window manufacturer doing an estimate on a store-front window system.
As a manufacturer, the bidding process can make or break a project before it even starts. A detailed, accurate count of materials and labor is crucial to know the true cost. With projects being so competitive, sloppy bids can quickly become a race to the bottom just to get the work.
What other obstacles are there? Well, how about every estimator on the team has a different system or method as well as a different percentage of waste or profit margin. How is consistency even possible with a ruler, notepad, and calculator?
Of course, as soon as you finish, a revision comes across your desk. How can we update an estimate to match the new scope of work when all our notes, math and markups are lost in the recycle bin?
Estimates – Collecting data
Considering all the parts of a window system, how do we quickly and accurately measure and count everything? The answer is custom measurement tools—and a little creativity.
First, let’s break down the parts of a store-front window system and the tools I would use for estimating material and labor costs. 
- Area Measurement: Total measurement of Assembly (SF Install) used with a price per square foot gives us our installation labor estimate.
- Count: Counting joints per Assembly (Store-Front Joint) used for the cost of materials estimate.
- Area Measurement: Different types of glass (SF-G1, SF-G2, etc.) again used for the cost of materials estimate. The perimeter length also provides the amount of caulking.
- Spaces: This tool is traditionally used to indicate markups within a “space” or room. However, we’re going to use it to create an assembly, so all parts are associated with a specific mark number. To be honest, I built my best guess of time, cost, and installation practices into formulas in the Custom Columns in the Markups List. When I build custom tools it’s extremely important for me to listen and understand legacy workflows. I am by no means an expert at Store-Front Glass. With the infinite flexibility within Revu, it’s my job to customize Revu to match the expert’s workflow. Let’s take a look.
Navigate to the store-front Elevations within the architectural drawings to see the required assemblies.

Here you can see store-front assembly SF-8. Let’s go through the steps of applying our custom tools:
With Snap to Content turned on, draw the area of each individual panel of glass. Be sure to use different types to match the material type spec out (GL-1 Standard, GL-1T Tempered).
Next, we place a Joint Count. Simply drop the symbol (SF-J) on the mullion grid as required.

Then, using the SF Install area measurement, trace the overall area of the entire frame (you can also click and drag).

Now, for the best part. Go to the Spaces Panel and create a new Space around the assembly naming it with the assembly Mark Number (SF-8). In this case, the Space is light purple, slightly larger than the frame. It’s important that all individual parts are completely inside the Space.

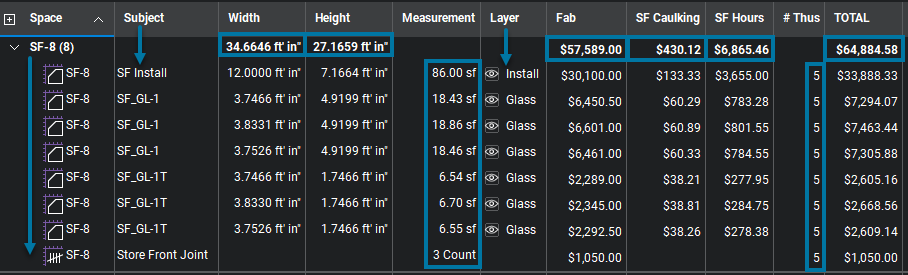
Now that we took less than a minute to label the parts, let’s look at the Bill of Material results in the Markups List from left to right. Revu also allows you to customize the order of the columns.

Space: Sort the Markups List by Space; you can see all the parts fall under the assembly Mark Number (SF-8).
Subject: A clearly labeled itemized parts list. This could be broken down into segments—for example, setup, data collecting, and processing data.
Width: Length of each horizontal frame and a total at the top (34.6646 linear feet). This information is automatically provided by the area measurement.
Height: Length of each vertical frame and the total at the top (27.1659 linear feet). This information is also automatically provided by the area measurement.
Measurement: Total measurement or count of each part.
Layer: Having spent more than 20 years in production using AutoCAD and Revit, I like to build Layers into all my custom tools for more flexibility when viewing or filtering the Markups List (install, glass, etc.).
Fab: This is an “Hours to Fabricate” formula column using the area measurement along with a factor of two hours per square foot, a shop labor rate of $35 per hour, times five assemblies ($57,589 Fabrication Total).
SF Caulking: With the length of vertical and horizontal frames provided, I simply enter a formula to account for caulking on the inside and outside of the glass, 23 linear feet of caulking at $8 a tube, times five assemblies ($430.12 Caulking Total).
SF Hours: This is an “Hours to Install” formula column using the overall area measurement along with a factor of 0.17 hours per square foot, a $50 per hour on-site labor cost, times five assemblies ($6,865.46 Install Total).
# Thus: After running a Visual Search for the Mark Number on the plans, I can highlight them indicating they’ve been accounted for and manually enter the number of times this assembly exists on the project. Since we cannot enter a quantity for “Spaces,” I entered “5” for the number of each individual part indicating five total assemblies.
TOTAL: Simply the total cost of Fab, SF Caulking, and SF Hours ($64,884.58 Total Cost for five SF-8 Assemblies)
Assemblies – Processing data
Now that we acquired all this information so quickly, there are a couple of different ways to use the data.
Sometimes I’ll leave out all the custom columns and formulas and use Quantity Link to bring all the data to a template estimate form in Excel. In this case, I wanted to show how powerful custom columns can be directly inside of Revu. Another option: I could export the Markups List to a CSV file to later import into another estimating software.
With just a few custom tools, assemblies are possible in Revu when those quantities merge with pricing formulas within the Markups List. Now with very little training, you could have just about anyone in the office color the elevations with the correct tools allowing the estimator to backcheck.
(In full transparency, we’re not able to Quantity Link data from custom columns in Revu. You would want to link the measurement data and build the formulas in Excel rather than Revu. I’ll show another great example of assemblies using Quantity Link in a future article.)
There you have it—creating assemblies in Revu. The intent of this article is to leave you inspired and thinking “could this apply” to my specialty. Whether a cabinet/millwork estimator, steel detailing, residential or commercial flooring, low voltage audio/visual or security, these can easily be applied. Or maybe precast panels, or electrical, mechanical and plumbing pre-fabrication assemblies.
Assemblies ARE possible in Bluebeam!
Bonus Tip: When the drawings are updated, use Compare Documents to see which of the store-front elevations changed. (because clouding changes has become less and less popular). Knowing what changed, simply update the existing markups and your estimate is updated. don’t start over. definitely don’t just eat the cost. You also have documentation of the scope changes to back up additional fees.
If you have any questions or tips you’d like to share with the global community, join the UC2 Brainery forum and work toward your Brainery Black Belt!
For more information on this topic, Click Here for a parallel article written for Bluebeam.
Troy
I really like what you are doing but for me and what I see daily as a millwork estimator it is a non starter. If I understand your system correctly it requires elevations of every object you are defining. We almost never see drawings that have every object we need to take off in millwork quote elevated. So our system revolves around marking up a floor plan to define our scope. By doing this it also keeps every thing in context and using spaces we can then define the take off by room.
Would like to hear your comments
Thanks
Jeff
Many materials are not available in an elevation for estimating, so this workflow is not going to work for everyone. Essentially, you’re using the same workflow with each room being an assembly which is a traditional use of the tool. Thanks for reading and commenting Jeffrey, I appreciate it!
Troy I have recently moved from a commercial roofing estimator to a gypsum board, metal studs and acoustical estimator. I am interested in building a assembly for a wall area that will give me a complete total of material quantities. Some walls may have 20 ga metal studs at 16″ o.c. and 5/8″ Gyp Board on both sides with a level 5 finish while the others have double 5/8″ Gyp Board on both side.
I’ve built tools similar to these. I would have a custom column with a “Choice” to select the number of layers of sheathing. I would also have a “Choice” column for standard stud spacing options. With both of these built into the formulas, you will get the results you’re looking for. It sounds like you might have it under control yourself, but if you need help let me know.