Land Development Bluebeam Tools of the Trade

Land Development Bluebeam Tools of the Trade
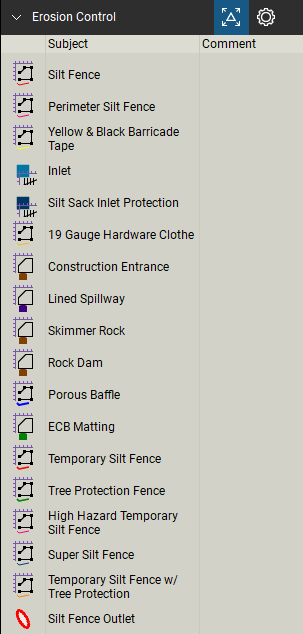
Tool covered:
- PolyLength
- Custom Line Styles
- Volume
- Spaces
- Legends
- Snapshot
Here is a link to the quick video I pulled together for this blog post.
Measuring linear footage or meters is easy in Revu. The tool we want to use is called Polylength and can be found in a couple of different places. The first place is under the Tools > Measurements menu at the top of the Revu interface. Depending on the profile, you might have a measurement toolbar on the top or either side of the drawing area. I personally like to access mine in the Measurement Panel I have located on the right side.
By updating the PolyLength color, line width, and line style in the Properties Panel you can start to build and save custom tools to your toolchest for future projects. There are a few line styles to choose from in the menu, or you can click on Manage at the bottom of the list and create a custom one to match your needs. I’ll cover this in detail in a future blog post.
It goes without saying, but the first step in measurements is always calibrating the drawings. Across the top of the Measurement Panel, PolyLength is the second tool from the left. Simply click points on the drawing along the line you’re measuring, in this case, the silt fence. When you get to the end, just double-click to finish. Notice it displays the length of each line segment and the total. If you accidentally placed a wrong click, just hit the backspace button on your keyboard. You don’t have to delete and start over. If a revision comes out and the path of the fence changes, simply hold the shift key down and click anywhere you want to add or remove a grip.
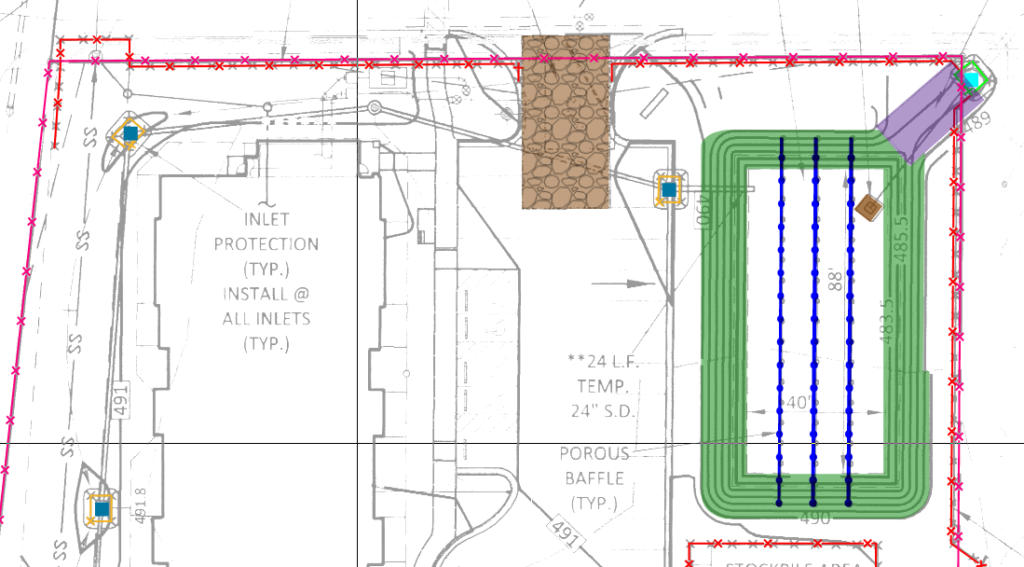
Volume measurement is just as easy. Now that you know where the measurement tools are located, click on Volume and pick all the corners of the area you want to measure. Backspace and shift key tips work on these as well. You’ll notice when you first trace over the shape and complete the markup, it will report 0 cu ft. This is because a depth wasn’t applied to the area you traced. If you select the markup and go to the Measurement Panel, about 2/3rds of the way down you’ll see Depth, enter the depth of material and the volume will then calculate. If you’re calculating cut & fill measurements, I usually follow the contours to outline the area and apply the average depth to the entire measurement. Check out this video for more ideas.
If there are different phases or areas of the project you want to isolate, you can use Spaces. On the black Panel bar on the left, right-click go to Show > Spaces. Once the Spaces Panel opens, click the Add Space button and draw over the area for each phase and name it appropriately. Now all your markups that fall completely inside that Space will allocate to that phase. You may have to get creative with your phase lines because they cannot overlap.
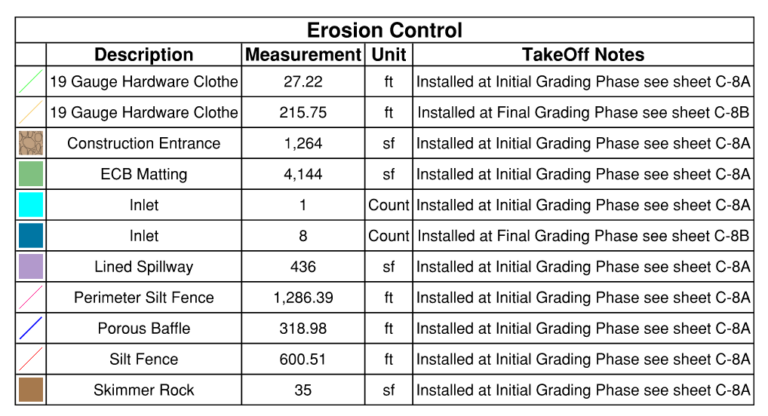
Now that we have all our measurements laid out and broken down by phase, we can build a Legend to display our quantities. The easiest way to create a Legend is to select all the markups on the sheet or in the Markups List you want in the legend, then right-click and select Add to Legend. Looking at the Properties Panel you can quickly update the layout and format including which columns of data you want to include. Legends are live, so as you make more markups with those same tools, the quantities will increase or decrease.
Finally, let’s circle back and show you how to combine all your individual plans into one large master plan. The Snapshot tool is one of my favorite tools. I use it for REF’s, building custom tools and in this case building a large site plan. Navigate the menu bar to Edit > Snapshot and Revu is ready for you to draw a border around the area to copy. You can click and drag a rectangle or pick along an irregular shape. Double-click or hit enter to complete the shape and Revu will flash blue indicating it took a picture of the area. Now just go to another sheet, right-click, and paste. The image will come in as a markup you can move around on the page. Using the linework in the image, line each image up with the others. You can also use the arrows on your keyboard to nudge them. Once in place, I like to lock them using the checkbox in the Properties Panel. Check out this video for more information.
I hope highlighting a series of specialty contractors is helpful. Whether this is an exact match to your specialty, or you draw inspiration to your workflows, I’m happy to help in whatever capacity. Having built custom tools and workflows for hundreds of companies, I may have already worked with your peers and could easily apply best practices to your workflows. A quick call can kick things off.
For more information on this topic, Click Here for a parallel article written for Bluebeam.
[…] Like all the others you can learn more about the technical tools in my parallel blog post, ‘Land Development Bluebeam Tools of the Trade‘. This one has a little different back story, but it explains my approach to every Bluebeam […]
[…] Informationen zu den technischen Werkzeugen finden Sie in meinem dazugehörigen Blogbeitrag „Land Development Bluebeam Tools of the Trade“ (nur in Englisch verfügbar). Dieser Artikel hat einen etwas anderen Hintergrund, der darin […]
[…] Like all the others, you can learn more about the technical tools in my parallel blog post, “Land Development Bluebeam Tools of the Trade”. This one has a little different back story, but it speaks to my approach to every Bluebeam […]
[…] Like all the others you can learn more about the technical tools in my parallel blog post, “Land Development Bluebeam Tools of the Trade.” This one has a little different backstory, but it speaks to my approach to every Bluebeam […]