Don Walke
Member
Forum Replies Created
-
 Points: 6,350Rank: UC2 Brainery Purple Belt I
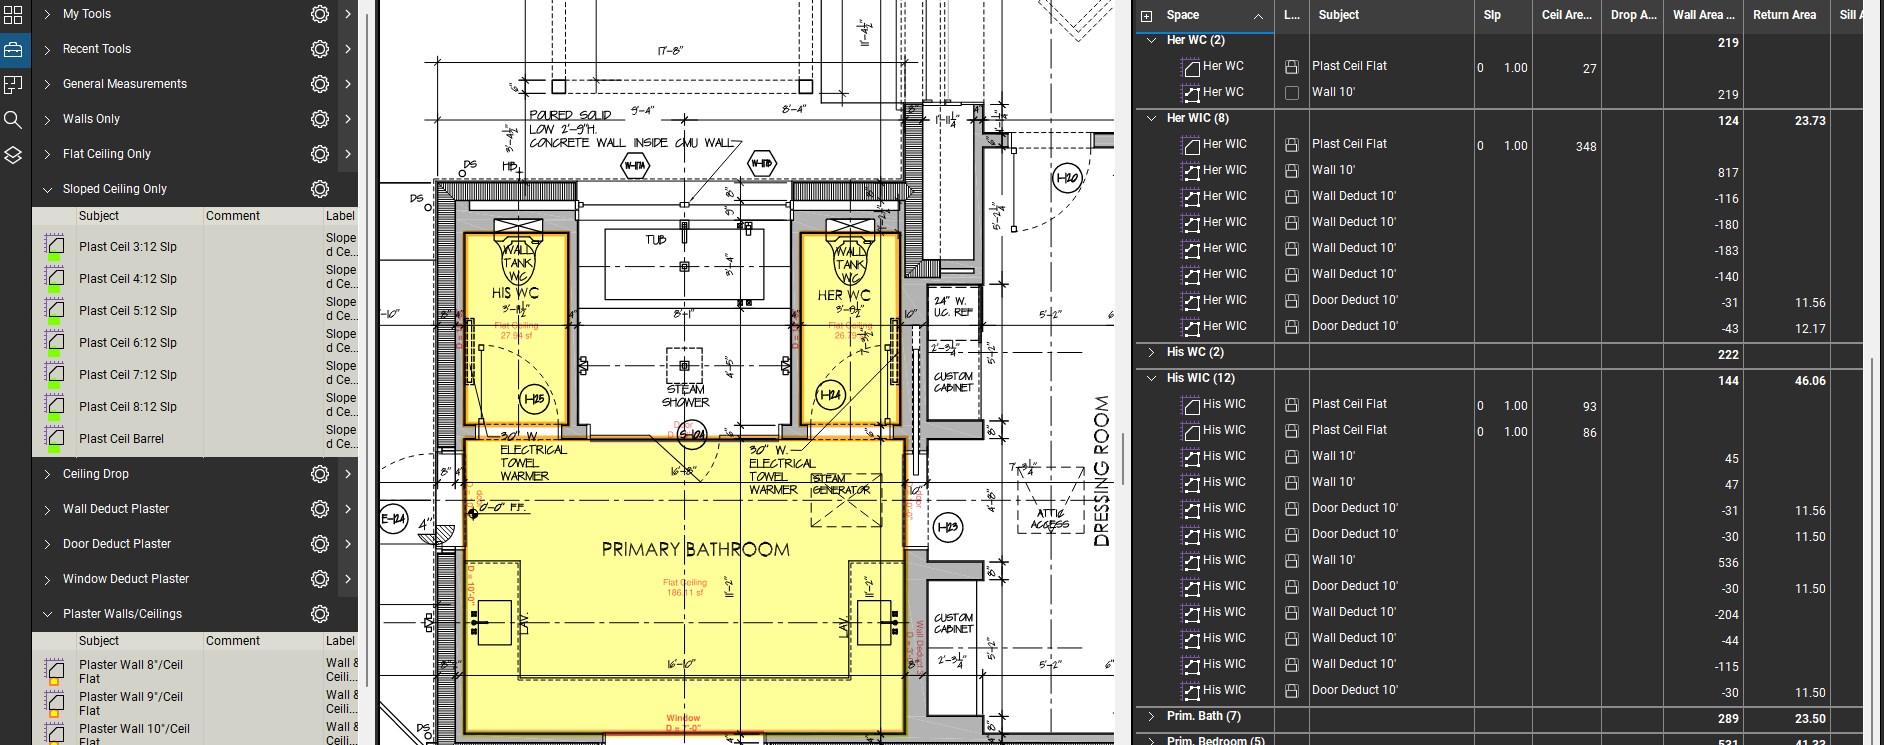
You could also create a couple of custom columns to calculate the area less the cutouts. First, create a column titled for example “Wall Area Y-N-D” which would be a choice with Yes, No and Deduct as the choice and +1, 0 and -1 as the associated values. Then create a “Total Wall Area” column which would be a formula (Area * “Wall Area Y-N-D” )
Save an area tool with “Yes” as the value in the “Wall Area Y-N-D” column and save an area tool to calculate the deduct areas with “Deduct” selected in the “Wall Area Y-N-D” column. Now take off the total area then use the deduct tool to take off the deductions.
If you then create a space to for each location you want to calculate and sort by spaces, the subtotal in the “Total Wall Area” will be the result you are after.
I use this and similar techniques to try to get as much info out of the fewest number of markups. In the above example, you could use the cutouts to calculate the length of curb at each island, the area of sod, ect.
-
Points: 6,350Rank: UC2 Brainery Purple Belt I
It’s hard to determine exactly what the info provided will be used for, but I assume, from a builder’s perspective the info is used to both organize and estimate the costs of windows, doors and installation.
As mentioned above, a count and an area markup will do the trick if a proper workflow is set up. My take as follows:
Go to the window and door schedule and create an area markup at each type of window and door. Go back and create a text box within each area markup. Group each and add to toolbox (as noted above, cursor on area, not text box when grouping). Create a sequence and rename in accordance with mark in the schedule. Now place sequence markup at each window or door location on elevation drawings.
Each markup will be unique with name (from schedule) and sequence. Area and length (perimeter) will be correct.
-
Points: 6,350Rank: UC2 Brainery Purple Belt I
Bob, I use an area measurement in painting take-offs to quantify the ceiling area, the wall area (using “length” function of an area markup multiplied by the “depth”), the lf of baseboard and lf of crown. You have to get a little creative with formulas and additional columns to isolate your totals of specific items. though. I wish that Revu had an “if” function, but there are work-arounds. It seems that a polyline is a polyline no matter what you call it in a toolbox be it a lenth of pipe or lf of crown moulding. My workaround if I want to total a particular line item is to create a choice column with Yes = 1 and no = 0. The column that will total a particular tool will be a formula column that multiplies the length by the result of the choice column (1or 0) so that only tools with a pre-selected “Y” will populate the column. This allows me to sort a plan by space and get totals for each selected tool for each space (in my case room numbers)
-
Points: 6,350Rank: UC2 Brainery Purple Belt I
Join the club. I may be off base, but my understanding is that “save to profile” in this instance saves the columns to that particular PDF. Try going to profile/save profile, them profile/manage profiles and export the profile o a directory for safe keeping. I’ve had profiles get corrupted and had to delete them and import a copy.
-
Points: 6,350Rank: UC2 Brainery Purple Belt I
As far as sorting goes, I use a prefix number on my tool subject names so that when i sort by subject, the markups will be in a specific order and not alphabetical.
-
Points: 6,350Rank: UC2 Brainery Purple Belt I
This is an interesting topic. The major point I see is that there is a difference between estimating and project buy-out. While in the estimating function, You are most likely bidding against other bidders and need to be careful not to bloat the pricing and lose out on the bid. It needs to be quick and efficient, adjusted for market conditions, completed and forgotten about so you can concentrate on the next bid. There is art to it.
Once the bid is awarded, the buy-out guys can worry about efficient material purchases, that’s their job. They can buy over multiple jobs, buy in bulk, ect.
Just my two cents.
-
Points: 6,350Rank: UC2 Brainery Purple Belt I
I run into the same issue where there are a couple of hundred layers on the original PDF. I assume it is from the architect or engineer starting a project with a template which contains all of the layers, but they usually use only a fraction of the layers to draw (unused layers are greyed out in the list of layers). Maybe turn off the unwanted layers prior to printing to PDF.
-
Points: 6,350Rank: UC2 Brainery Purple Belt I
I have a similar problem, but not with layers. Seems that every two or three times I open the program, one or two of the tools gets corrupted. It’s always the first tool in a toolbox, and the tool acquires attributes of some other tool in another toolbox (subject, layer, color, ect). I just replace the profile with a saved copy.
-
Points: 6,350Rank: UC2 Brainery Purple Belt I
Well….grouped an area measurement with a sequence tool, that didn’t work. The area attribute disappeared from the markup after grouping. Next…..
-
Don Walke
MemberApril 2, 2023 at 11:29 am in reply to: Getting rid of layers that came from customerPoints: 6,350Rank: UC2 Brainery Purple Belt II always keep an unaltered original just in case. Some architects eave up to several hundred layers in their drawings and come to think about it, maybe nest all the originals under a new collapsed “Architect” layer and keep my layers separate. 🤔
-
Don Walke
MemberMarch 30, 2023 at 12:53 pm in reply to: Getting rid of layers that came from customerPoints: 6,350Rank: UC2 Brainery Purple Belt IAlso, If I can isolate the layer that has a hatch showing type of wall for example, I delete the cont of that layer so that if I am trying to select a corner of a room I don’t accidentally select an intersection between a wall line and a hatch line.
-
Don Walke
MemberMarch 27, 2023 at 9:34 am in reply to: Getting rid of layers that came from customerPoints: 6,350Rank: UC2 Brainery Purple Belt II generally delete the architects layers prior to doing my take-off, as I use layers to organize and better view my work. You should get a dialog box confirming the deletion with the option of saving or removing the content of the layer.
-
Points: 6,350Rank: UC2 Brainery Purple Belt I
Thanks, will give it a go.
-
Points: 6,350Rank: UC2 Brainery Purple Belt I
That sounds great. Got any clues on how to set up a macro? Last time I did anything like that was using Lotus 123.
-
Points: 6,350Rank: UC2 Brainery Purple Belt I
Good idea, just odd that a program with such valuable and unique functionality would have glitches like this.